

3 Ingredient Paleo Flaxseed Crackers
/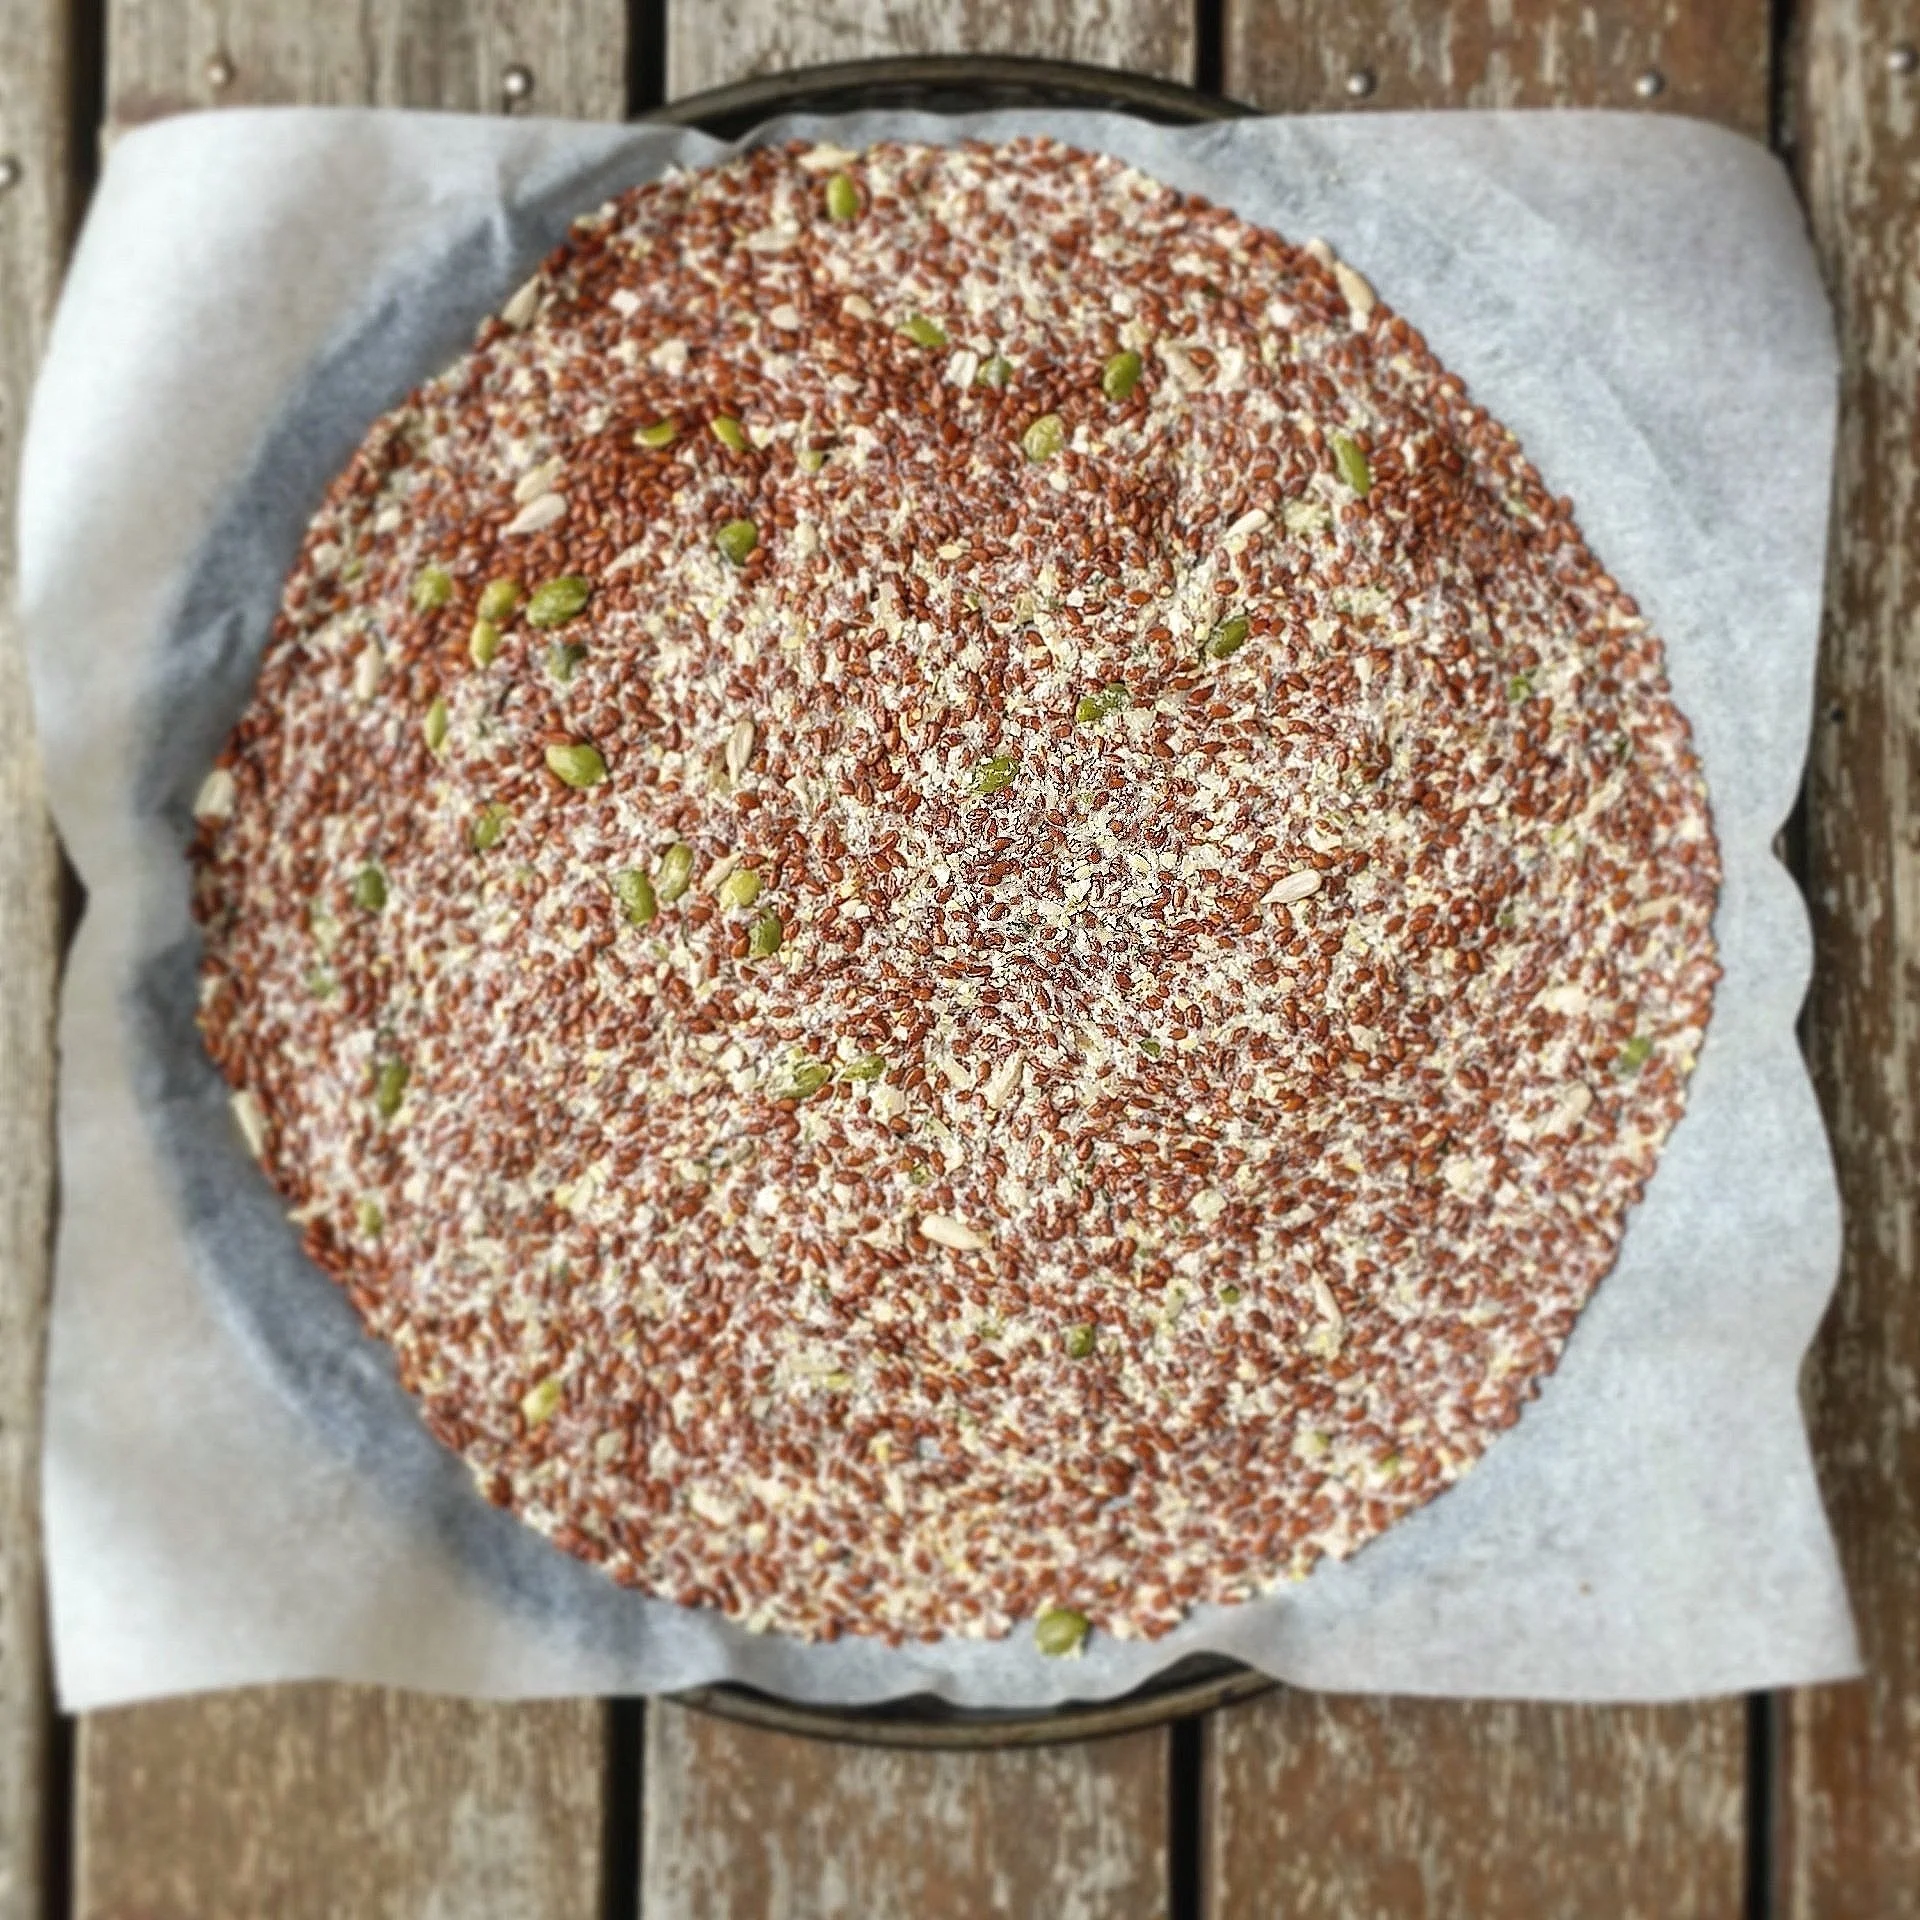
Super easy crispy three ingredient crackers. Keto/low carb friendly, free of gluten, dairy, sugar, seed oils and additives but full of flavour. Nutritionist approved
Read MoreSuper easy crispy three ingredient crackers. Keto/low carb friendly, free of gluten, dairy, sugar, seed oils and additives but full of flavour. Nutritionist approved
Read MoreBest ever allergy-free banana cake! GF, DF, refined and sugar-alternative free and baby friendly!
Read MoreNever tried a seafood curry as you thought it was too hard? This simple, clean and delicious recipe will change your mind!
Read MoreThese are an amazing, healthier version of a good old traditional Aussie favourite. Completely grain and dairy free, this version keeps the coconut buttery goodness of a traditional Anzac but replaces the white sugar and flour with nuts and honey or maple syrup. YUM!
Vegan, dairy -, gluten-, refined sugar & grain-free
Ingredients
Dry Ingredients
· 1 cup unsweetened desiccated coconut
· 1 cup almond meal
· 1 cup walnuts, finely chopped
Wet ingredients
· ¼ cup coconut oil, semi form (if melted, you may need a little more than ¼ cup)
· ¼ cup honey or maple syrup
· 1 tsp baking powder
· 2-3 tsp water
Method
Preheat oven to 120 deg C (note lower temp than normal – too high and these cookies will burn before they’re ready- this is a case of go low and slow)
Line tray with baking paper or silicon baking sheets
In a large mixing bowl add all the dry ingredients and mix well. Set aside
Place coconut oil & honey/maple syrup in a small saucepan and melt. Watch it doesn’t bubble over. Take off heat and add baking powder and water, stirring until it foams and turns a whitish colour.
Pour this wet mixture into the dry ingredients and stir until well combined. You may need to add a little more water until it comes together. You should be able to press the mixture together and not have it crumble.
Use a tablespoon and place balls of mixture onto the tray. Flatten slightly- you can also firm up the edges where they crack if you like.
Place tray in oven and bake for approximately 12-15 minutes before checking – if your cookies are thin, this will be enough to make them firm, otherwise you may need another 5-8 minutes. You want them golden brown on top (white is not cooked enough) but not black on the edges.
These taste awesome warm out of the oven but the flavours intensify if cooled and eaten the next day!
Nourishing Notes:
· Chop the nuts as finely as you can but you can leave some larger chunks. Too many big chunks and the bikkies will fall apart
· Measuring coconut oil solid or melted makes a difference to the final volume so important to note what you use. Solid coconut oil will take up less volume than melted so keep this in mind when baking.
· How flat you make them will determine how long you need to bake them for and how soft & chewy they are after baking – these cookies won’t flatten much themselves during baking so how you put them in tends to be how they’ll stay. This is personal preference!
· Store in baking tin or container in the fridge.
Credit to The Merrymaker Sisters for the original recipe.
Paleo means free from gluten, grains, dairy, refined and processed sugar, white flour. It does not mean doesn’t taste good!
This chocolate paleo cake is loved by health nuts as well as those that who would normally roll their eyes at the hearing the words ‘refined sugar free’ or paleo. It really DOES taste good and if you pair it with either the creamy avocado chocolate or coconut cream icing that I’ve described below, it becomes to die for. Credit to The Loopy Whisk, whose recipe I followed (almost) to a tee – I’ve reduced the sugar slightly and tweaked the measurements to be all the same as I find baked goods tend to work better when you use either weight or volume – I’m definitely a cup/tsp type of person as I find it’s the easiest and most efficient way to measure out things, especially if you use a smaller measurement for the bigger ones ie. ¼ cup to measure out 1 cup. Just do the dry ingredients first!
Ingredients
· 6 Tbs coconut oil, melted
· 3/4 cup honey or maple syrup
· 8-9 Tbs cocoa or cacao powder *See notes on the difference between cacao & cocoa powder
· 3 medium eggs, free range and organic where possible
· 3/4 cup non-dairy milk (I use coconut milk, the one on the carton not the can)
Dry ingredients:
· 3/4 cup coconut flour
· 3/4 cup arrowroot flour
· Pinch of sea salt
· 1 1/4 tsp bicarb soda (or baking soda as the US calls it)
· 1 1/4 tsp baking powder (gluten free)
A little extra:
· Handful of fresh or frozen raspberries, grated dark chocolate or finely chopped macadamias
Method
Preheat oven to 180 degrees C. Place your baking tins on an oven tray – I used three approximately 15cm wide mini tins. If using silicon tins, you won’t need to grease them as they’ll pop right out. Otherwise grease and line with baking paper so the cakes doesn’t stick.
Mix all dry ingredients except the cocoa powder in a bowl and set aside. Make sure the bicarb and baking powder are well distributed and not in chunks.
Add coconut oil and sweetener to a bowl. Slowly whisk in sifted cocoa powder or sift as you add which makes it easier to prevent clumps. It should look like liquid chocolate when finished.
Add eggs one at a time and mix well after each. Add the milk and stir evenly through.
Add the dry ingredients into the wet chocolate batter and stir until everything is well distributed and there are no clumps. The batter should be quite dense and thick which is perfect.
Pour into your tins and flatten out the tops, spreading so there’s even a little more around the sides especially if you want to stack them as they pop up in the middle during baking.
A little extra: If using a little extra, you can add to the batter at this stage or stir through just before you pour into tins. Our favourite is with raspberries which add a fresh little pop amidst all the chocolate - I just pressed the berries into the batter once they were in their tins and roughly smoothed them over.
Bake in preheated oven for 20 mins if making 3 small tins – see notes on cooking times. A skewer should come out clean and the bottom will be firm. While undercooking is better than overcooking (which dries it out), you also don’t want the cake to not be cooked enough as it will stick to the sides and the middle will collapse. Still tastes great but not what you want in a cake!
Turn out onto a wire rack and cool before assembling and icing or freezing.
Icing
I’ve done this cake with 2 types of icing, both vegan and paleo and each complements the chocolate really well depending on what you feel like. Both are also common ‘healthier’ icings found in vegan and paleo baking that you can use for lots of other things (or eat on its own!!)
Choc avocado icing
· 1 large ripe avocado - must be soft & ready to eat but black is too ripe
· 3 1/2 tablespoons maple syrup (you can sub honey if not vegan)
· 2 1/2 tablespoons cocoa powder
· Pinch sea salt
Place the flesh from the avocado, honey and cocoa powder in a processor and blend until smooth. Start with 1-2 tablespoons of each, blend then taste – this way you can adjust for your own preference for sweetness and chocolate-ness. Spread between the cakes and on top – the leftover can be used as a spread for toast (or simply out of the bowl :P)
Coconut cream icing
1 can of coconut cream (not milk)
¼ cup maple syrup (again you can sub honey if you’re not vegan)
1 tsp vanilla extract or essence (optional)
Put tin of coconut cream in the back of the fridge overnight – it needs to get cold but not frozen. You can put a couple of cans in the fridge just in case one doesn’t work (handy especially if you’re making it for a special occasion!). The next morning, remove the can and open the lid. Carefully scoop out the solid cream on the top into a bowl – it should have separated overnight and the liquid portion should be on the bottom, which you can discard.
Add half of your sweetener and vanilla if using and whip until fluffy and smooth. Add more sweetener until it’s sweet enough for your liking – everyone’s preferences are different so I always start with a little less then add more as needed. Store in the fridge until ready to use. You can either serve on the side or use as an icing between layers but you definitely want to wait until the cakes are cooled as this one can melt.
Nourishing Notes:
· Best tip for baking Paleo is to bring everything to room temperature first, so get your eggs and milk out a few hours before. Otherwise when you add the oil it solidifies and goes chunky, making it hard to distribute.
· I used 3 silicon cake tins from Daiso (they’re approximately a small dish size) and it stacked them to make a tower cake - it’s actually a pretty small cake but super cute and one I made for my little girl’s first birthday as you can see! You could also do this as muffins but will need to reduce the baking time significantly. I would start at 7 mins for a standard size muffin tin.
· Cacao vs cocoa powder: in short, cacao is the less processed form of cacao beans (cocoa is fermented AND roasted, making is slightly sweeter). It is also usually more expensive and in regards to baking, has a stronger, slightly more bitter taste so you would usually use less. Cacao powder also tends to absorb more liquid so keep this in mind – I would add an extra teaspoon of oil or milk to the mixture and slightly reduce cooking time. Cocoa powder is more easily found and usually cheaper and less intense in taste - just make sure you select cocoa only and not one with any added sugars. They can be used interchangeably in baking depending on what you have available, just adjust amounts slightly as explained. The original recipe used approximately 10 tbs of cocoa powder but I found 8-9 give a sufficient chocolatey taste especially if using cacao powder
· I would err on the side of undercooking vs overcooking for this recipe – I usually set the timer for 10 minutes less and check with a skewer. It can really dry out and tastes way better when slightly gooey. You can freeze the individual cakes easily too, and they still taste great when defrosted. Sinply freeze without icing.
These lemon chia seeds muffins are a delicious guilt-free snack loved by kids and adults! They contain healthy omega 3’s, protein & choline (eggs) needed for brain health and development and are a sweet treat that won’t cause your blood glucose levels to go out of whack.
Read MoreWho doesn't like protein balls? These nutty balls are so named because their protein comes mainly from the nut butter used rather than from the addition of protein powder. Whilst I don't have anything against a good quality, no filler whey or vegan protein as a supplement to a good diet (especially post training), I don't often add them to snacks that I make for my partner because he's lactose-intolerant. It also makes these balls pretty much as unprocessed as you can get!
Ingredients
• 1 cup dates, roughly chopped
• 1/2 cup organic nut butter (nuts only with no added nasties)
• 1/3 cup mixed seeds (sunflower, pumpkin or flax)
• 1 tbs raw cocoa powder
• Pinch cinnamon
• Pinch Himalyan salt
• Desiccated coconut for rolling
Method
Put chopped dates in a blender or food processor and blend until moderately smooth. Add seeds, blend further (they can stay a little chunky). Add nut butter, cinnamon & salt and blend until the mixture comes together. You may need to add a little bit of water to get the mixture smooth.
Spoon out tablespoons of mixture, roll into balls and press into coconut.
These are awesomely stick-to-the-roof-of-your-mouth-delicious and naturally sweet from the dates. They are great as an alternative to chocolate or perfect as a high energy snack after training or for breastfeeding mums. I would recommend keeping them in the fridge but they won't last for long!
Get our latest kid-friendly recipes, exercise tips and ways to live more naturally, healthier and balanced straight to your inbox!
We promise to always respect your privacy
We acknowledge and pay respect to the Gubbi Gubbi People, the traditional custodians of the land on which we work and live. We pay respect to Elders past, present and emerging and recognise their continuing connection to land, water and community
Copyright © 2026 Absolute Potential Health & Performance. All rights reserved


